How to disassemble Sony
MHC V71 home audio system, test modes, how to take the disc out at emergency,
Power board fault diagnosis
US Model, Canadian
Model-MHC-V71
AEP Model, UK Model, E
Model, Australian Model-MHC-V71D
Destination setting
method
The destination information isn’t written in the MOTHERBOARD board for the
service.
Therefore, when the MOTHERBOARD board is replaced, be sure to perform the
destination setting (Important work).
Note 1: The initial setting
destination of the MOTHERBOARD board for the service is temporary set as
“LATIN”. The message “LATIN (T)” is displayed on the screen display panel.
Note 2: When distinguishing the destination of the product, refer to the “MODEL
IDENTIFICATION”
Note 3: If destination setting isn’t performed, it is possibility to occur the
defect to each operation of this unit.
Note 4: Destination would be locked if it has changed for 5 times.
Touch two touch keys of the [FIESTA] and { TUNING +
>>| } simultaneously for 10 seconds during the demonstration mode.
2. It enters the destination setting mode, the message "D XXXXX" is
displayed on the screen display panel.
Note 5: If the message "DESTLOCK" is displayed on the screen display
panel, touch the [>] touch key to release from this mode.
Because the destination is locked, and it cannot change the destination..
3. Touch [ 0+ ] / [ - ] touch key to
select the destination based on the set's country.
4. Touch [ > ] touch key to confirm
the selection.
5. "RESET" appears on the screen display panel. After that, "SONY
“appears on the screen display panel. The system automatically turn on and off
once. Please be sure that the system stay at demo mode finally before switch
off the power supply.
6. Mode in "MODEL, DESTINATION AND VERSION DISPLAY MODE" again to
confirm on the model & destination.


When the SENSOR board is defective,
exchange the SERVICE, TOP PANEL ASSY.
When the MS-476 board is defective,
exchange the entire LOADING COMPLETE ASSY (T).
When IC2002 on the MOTHERBOARD board
and the complete MOTHERBOARD board are replaced, it is necessary to spread the
heat-sink compound between parts and heat sink.
Releasing the disc tray
lock
The disc tray lock function for the antitheft of sample disc in the shop is
equipped.
It can release the lock function in the following procedure.
Press the [Power] button to turn the
power on.
2. Touch the [FUNCTION] touch key to turn the DVD/CD function.
3. Touch [MEGA BASS] and [VOCAL FADER] touch keys simultaneously for three
seconds.
4. The message “UNLOCKED” is displayed on the screen display panel and the disc
tray is unlocked.
Note: When “LOCKED” is displayed on the screen display panel, the disc tray
lock is not released by turning the power on/off with the [Power] button.
IF “PROTECTX” (X IS A
NUMBER) AND “CHECK MANUAL” FLASHES ON THE DISPLAY
immediately unplug the AC power cord (mains lead), and check if anything is
blocking the ventilation openings of the unit.
After you have checked and found no problems, reconnect the AC power cord
(mains lead), and turn on the system. If the issue persists, contact your nearest
Sony dealer or the authorized service center.
How to open the tray
when power switch turn off/ How to take out the disc in emergency
Note 1: After the side panel L, R are removed, this work is done.
Note 2: prepare the thin wire (clip etc. processed to the length of 8 cm or
more)
Remove side panel L, R.
Insert the clip etc. processed to the length of 8 cm or more in the hole on the
side of the CDM and push. [Refer to the fig below]

Service position

Disassembly procedure of
the side panel

Disassembly procedure of
loading panel assembly

Disassembly procedure of
the top panel [be very careful not to damage any of the flat cables, while
tacking the assembly apart]

Rear cover &
ventilation cover disassembly

Disassembly of the back
panel section

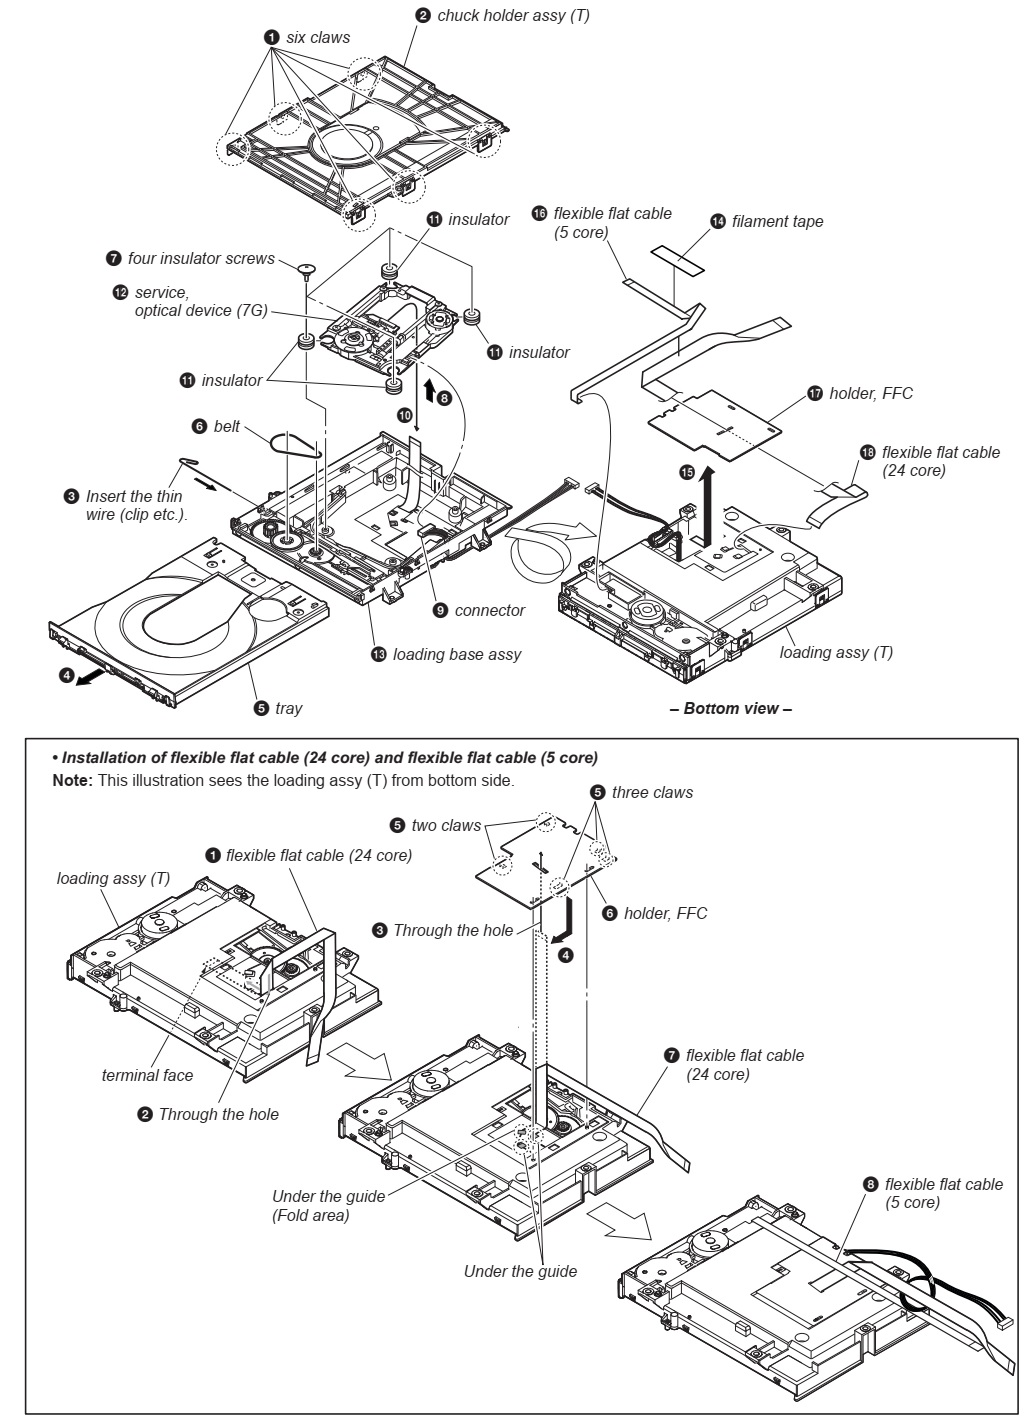
Disassembly of the CDM
section

Optical device [7G] &
flexible cable service
Dismantling the
Motherboard

SMPS/ the power board
removal

Front panel [Vanilla]
section disassembly

Bottom cover removal

Test modes
Panel test mode
This mode is used to check the screen display panel, LEDs, buttons, touch keys
and GESTURE CONTROL sensor.
1. Press [Power] button to turn on the system.
2. Touch [<]
touch key and [MIC/GUITAR LEVEL -] touch key simultaneously for 3 seconds.
3. All LEDs and segments in screen display panel are lighted up.
This is the display check mode.
Touch [ > ] touch key repeatedly to toggle different display mode as below:
Segments on screen display panel:
All On → 1st Group On → 2nd Group On → All On → All Off
Single color LEDs:
All On → All Off → 1st Group On → 2nd Group On → All Off
Multi Color LEDs:
All On → Red → Green → Blue → All Off
4. Touch [0 - ] touch key, the key check mode is activated.
5. In the key check mode, the screen display panel displays “K 0”
Each time a button/touch key is
pressed/touched, “K” value increases. However, once a button/touch key has been
pressed/touched, it is no longer taken into account. After all the buttons and
touch keys have been pressed/touched, “K”
value will toggle between “OK” and “K30”.
The screen display panel displays “<” or “>” or “U” or “u” on the right
side of “K30 OK” each time swing left, right, up and down at GESTURE CONTROL.
6. To release from this mode, touch the touch keys in the same manner as step
2, or disconnect the power cord.
Model, destination and
version display mode
This mode is used to check the model, destination and software version of the
set.
1. Press [Power] button to turn on the system.
2. Touch [<]
touch key and [MIC/GUITAR LEVEL -] touch key simultaneously for 3 seconds.
All segments in screen display panel are lighted up.
3. Touch [ +] touch key. Model information appears on the screen display panel.
4. Touch [ +] touch key. Destination information appears on the screen display
panel.
5. Touch [ +] touch key. Serial number appears on the screen display panel.
6. During serial number appears, touch [0 +] touch key. Each time [ +] touch
key is touched, the screen display panel shows the version of each category
software in the following sequence: SC, MTK, BT, BTE, PF, SUB and return back
to
model information display.
7. Touch [<]
touch key and [MIC/GUITAR LEVEL -] touch key simultaneously for 3 seconds to
exit.
User reset
The user reset clears all data including preset data stored in the data flash
to initial conditions.
1. Press [Power] button to turn on the system.
2. Touch [GUITAR] touch key and [MEGA BASS] touch key simultaneously for 3
seconds.
3. “RESET” appears on the screen display panel. After that, the screen display
panel becomes blank for a while, and the system goes to demo mode.
Cold reset
This mode is used to reset all the user settings to factory setting.
Execute this mode when returning the set to the customer.
1. Press [Power] button to turn on the system.
2. Touch [<]
touch key and [MIC/GUITAR LEVEL +] touch key simultaneously for 3 seconds.
3. “COLD RST” appears on the screen display panel. After that, “SONY DEMO”
appears on the screen display panel. The system automatically turn on and off
once. Please be sure that the system stays at demo mode finally before switch
off the power supply.
Disc tray lock
When the disc tray does not open and “LOCKED” appears on the screen display
panel, disc tray lock mode has been activated by the shop front.
To release from Disc Tray Lock Mode:
1. Press [Power] button to turn on the system.
2. Touch [FUNCTION] touch key repeatedly to select the DVD/CD function.
3. Touch [MEGA BASS] touch key and [VOCAL FADER] touch key simultaneously and
hold down until “UNLOCKED” displayed on the screen display panel.
Shop front demo
The playback started automatically and the “ * DEMO * ” appears on the screen
display panel.
This is the Shop Front Demo mode which is activated by the shop front.
Release from Shop Front
Demo
1. Touch [<]
touch key and [MIC ECHO] touch key simultaneously for 5 seconds.
2. The message "STANDBY" appears on screen display panel. After that, the screen display panel blinks
for a few times and the system goes to demo mode.
SMPS board and fault
diagnosis


No comments:
Post a Comment