Troubleshooting
Check list for initial operation
1. Check the various cable connections first.
- Check to see if there is a burnt or damaged cable.
- Check to see if there is a disconnected or loose
cable connection.
- Check to see if the cables are connected according
to the connection diagram.
2. Check the power input to the Main Board.
3. How to distinguish if the problem is caused by Main
Board or T-CON Board.
- No Video.
If the problem is No Video but BLU is on and
Indication LED is blinking repeatedly and faster than normal booting. [Replace the T-CON Board.]
Distorted Picture:
[Check the inner patterns.]
TV POWER STANDBY
1. TV in Standby
√ Standby LED Indicator
2. If Not Lit:
√ AC 120Vac Line
3. If missing:
√ 120Vac Source and Power Cord
4. If OK:
√ Resistance on SMPS Fuse after first removing AC
power cord.
5. If fusses are open replace SMPS.
6. If fuses are OK:
√ Standby: A13V (Always On) to Main Board. Should all
be approx. 9 VDC
7. If any missing remove the SMPS connector to Main
Board .
√ Standby A13V again for 9VDC.
- If OK replace Main Board.
- If still missing replace SMPS.
FUNCTION-IR Control
1. TV in Standby
√ LED Status
2. If LED is OFF
√ LED 1.7Vdc (pin 8)and VCC for 3.3Vdc
• If missing suspect Function Assy/Cable/Main board.
3. If LED is ON
√ Switch Operation activates on screen display.


1. Check the STBY voltage from SMPS to Main Board. If
STBY is OK suspect Main Board.
2. Check Jog Shuttle 5 SW Operation (Key 1 & Key
2) for command changes. If incorrect suspect a stuck Jog switch which also
holds data to Main preventing operation.
3. Check SDA, SCL for effective 3.3Vdc (after power
on)
4. Check IR with Standard Remote command changes.
(3.3V to 2.5V effective DC)

SMPS POWER
1. Power TV On.
√ PS_ON. 2Vdc (when off) changes to 3.3Vdc (on)
- May already be On if IoT USB is loaded or TV Smart
Things Hub mode is active.
2. if voltage error or no change.
√ Jog Function Control Test.
3. If OK replace Main Board.
√ All A13V supplies to full voltage level 12.7VDC.
4. If any wrong voltage, remove the SMPS connector to
Main Board.
√ A13V again for 12.7VDC.
5. If OK replace Main Board.
6. If still wrong voltage replace SMPS.
√ OD (Over Voltage Detect) : 3.3Vdc (Operating Normal)
7. If 0V or changing, an SMPS or Panel error exists.
Perform Backlight Test.
√ BLU_PWM 0V- Off to approx 1 – 3.3 V pending
Backlight dim level
√ If missing/error replace Main Board.

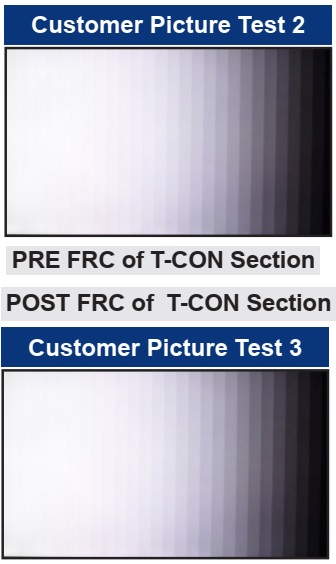
Video:
Customer Picture Test

MAIN / T-CON Board: Main Board Section
Video Operation : Generated on Main Section.
1. If OK:
√ Source & Input Cables.
√ Other inputs.
√ One Connect Cable/Box.
2. If Noisy:
√ T-CON Section Test Patterns.

PRE FRC of T-CON Section
Video Operation : Generated at Pre FRC, of T-CON
Section.
1. If OK:
√ Main Section.
2. If Noisy:
√ Post FRC Pattern.
POST FRC of T-CON Section
Video Operation : Generated at Post FRC of T-CON
Section.
1. If OK:
√ Main / T-CON Board (defective).
2. If Noisy:
√ Mute - 369 - Mute.
T-CON Section
NOTE: May not
be available for Larger models over 70 inches.
Video Operation : Generated at T-CON Section.
1. If OK:
√ Main / T-CON Board (defective).
2. If Noisy:
√ Main / T-CON Board.

PANEL
If Noisy:
√ Panel (defective).

AUDIO

No TV Sound
√ Menu → Audio → Speaker Settings set to TV Speaker
• Noisy / Distorted TV Audio
√ Customer Menu → Support → Sound Test
• If Sound Test FAILS : (Missing / Noisy Audio)
√ Speakers (compare resistance/quality)
• Compare audio level out to speakers with multi
meter.
√ Replace defective Speakers or Main Board or Cable.
IF Sound Test OK :
√ Audio Source & External Cables.
√ With external Audio Generator (device or App).
√ Other Inputs.
√ One Connect Mini.
Optical Digital Out Errors
√ Red light from Optical Digital Out.
• If missing replace One Connect Mini
No HDMI Audio
√ Source / HDMI Cable & One Connect Mini
Connectors.
• Swap with other HDMI Inputs/Sources.
• Perform EDID Write in Factory Mode (Can restore
missing HDMI Audio).
√ Bulletins and Latest firmware on TV.
• If not restored replace One Connect Mini/Main.
• Check Audio Format PCM/Dolby based on external
Receiver.
ARC Issues
√ HDMI Cable is input to the ARC Designated HDMI port.
√ ARC (HDMI Control) is enabled on the external
Receiver.
Bluetooth Audio "Sound Share"
Connection Issues
√ Sound Bar is in TV Mode.
• To Connect, Press & Hold Play Button until Sound
Bar pairing mode begins.
NETWORK
For
Netflix Operation/Connection Issues:
• Check Certificate
& Netflix ESN Status in Factory Mode.
- If Certificate and ESN exists, "CO", "NfO", change the DNS to 8.8.8.8
- If Certificate is missing, "C/" replace the TV’s Main Board.
- If ESN number is missing: NF/
do not
replace the Main Board.
• Reset TV Clock and check for correct
Time & Date. Netflix relies on correct settings.
• Reset Smart Hub. / Reset Apps In
Factory Mode.
For Streaming Issues:
• Go to TV Web
Browser / Go to speedof.me / testmy.net
√ Check Speed for at least 5 Mbps(HD streaming) / 25 Mbps
(4K Streaming).
√ Check Latency for less than 50ms.
WiFi Module pins and details

Go to Menu > Support > Contact Samsung
• If Bluetooth Address or Wireless MAC Address are missing
or errors exist.
• BT & Wi-Fi Connector Voltages.
- If Voltages are OK but no BT or Wi-Fi Signals voltage(s),
replace defective Module.

Factory Mode Adjustments
Entering Factory Mode
To
enter ‘Service Mode’ Press the remote-control keys in this sequence :
Factory Remote
1. Power
TV ON.
2. Select TV Source.
3. Info → Factory.
4. Use MENU for return.
Samsung IR Remote (Limited Operation)
1. TV Power Standby.
2. Press as follows.
|
• Remote Button : |
Power OFF > INFO > MENU > MUTE > Power ON |
Option (must set Option Bytes when replacing Main Board.)
• Option → Factory Reset (returns TV to out of
box condition. Does not reset Apps.)
• SVC → Test Patterns
•
SVC → Info → ER Count (Important to check for
errors.)
- Resets to 0 with Factory Reset.
First Screen Appearing in Factory Mode (SAMPLE)

Detail Factory Option
[If you replace the
main board with new one, please change the factory option as well. The options you must change are "Type".]

HDMI UHD Color
•
When you set the HDMI connection to On, the TV turns off and then on automatically.
• The HDMI connection with HDMI UHD Color set to Off supports up to UHD 50P/60P
4:2:0 input signals, while the HDMI connection with HDMI UHD Color set to On
supports up to UHD 50P/60P 4:4:4 and 4:2:2 input signals. For more information,
refer to "Supported Resolutions for UHD Input Signals.
• Each HDMI connection can be individually optimized for HDMI UHD Color. When
you connect the TV to an external device that supports only the UHD 24 or 30 Hz
frequency or any FHD frequency, the HDMI UHD Color function may not be
available. In this case, set HDMI UHD Color to Off.
HDMI Black Level
•
This function is only available when the input signal, connected to the TV via
an HDMI connector, is set to RGB444.
Codecs may not
function properly if there is a problem with the content data.
• Video content does not play or does not correctly if there is an error in the
content or container.
• Sound or video may not work if they have standard bit rates/frame rates above
the TV's compatibility.ratings
• If the Index Table is wrong, the Seek(Jump) function does not work.
• When playing video over a network connection, the video may not play smoothly
because of datatransmission speeds.
• Some USB/digital camera devices may not be compatible with the player.
• HEVC codec is only available in MKV / MP4 / TS containers.
The items’ colors and
shapes may vary depending on the model.
• Cables not included in the package contents can be purchased separately.
• The part code for some accessories may differ depending on your region.
Updating the TV’s Software
View your TV's
software version and update it if necessary.
|
• Settings
> Support > Software Update |
Updating the TV’s software to the latest version
|
• Settings
Support Software Update Update now |
You
can update your TV’s software by downloading the update from the Internet
directly to your TV or copying the update from a USB device that contains it to
your TV.
• Updating from the Internet requires an active Internet connection.
• To update using a USB flash drive, download the update package from
Samsung.com to your computer. Then, save the update package in the USB device's
top-level folder. Otherwise, the TV will not be able to locate the update
package.
[DO NOT turn off the
TV’s power until the update is complete. The TV will turn off and on
automatically after completing the software update. All video and audio
settings return to their default settings after a software update.]
Updating the TV automatically
|
• Settings
Support Software Update Auto Update |
If the TV is connected to
the Internet, you can have the TV's software update itself automatically while
you are watching the TV. When the background update is completed, it is applied
the next time the TV is turned on.
• This function may take a longer time if another network function is running
concurrently.
• This function requires an Internet connection.
• If you agree to the Smart

MAIN BOARD PIN MAP
Hub terms and condition
